Connecting your Xbox Controller
OS X does not have a built-in support for connecting Xbox controllers. The Original Xbox Controller, Xbox 360 Controller, Xbox One Controller and various licensed third party controllers from brands like Hori, MadCatz, Logitech, etc. can only be connected by installing a free third-party driver.
1. Install the driver
To get your controller working you need to install a free driver called 360 Controllers.
Download 360Controller
2. Connect your controller
After installing the latest driver you need to pysically connect your controller.
Wired controlller
In case if you have a wired controller you simply need to plug it into your Mac's USB port and press the big XBox logo button on the game controller to switch on.
Wireless controller
In case if you use a wireless model you'll need to purchase an "Xbox 360 Wireless Gaming Receiver". We do recommend you to buy the original receiver made by Microsoft.
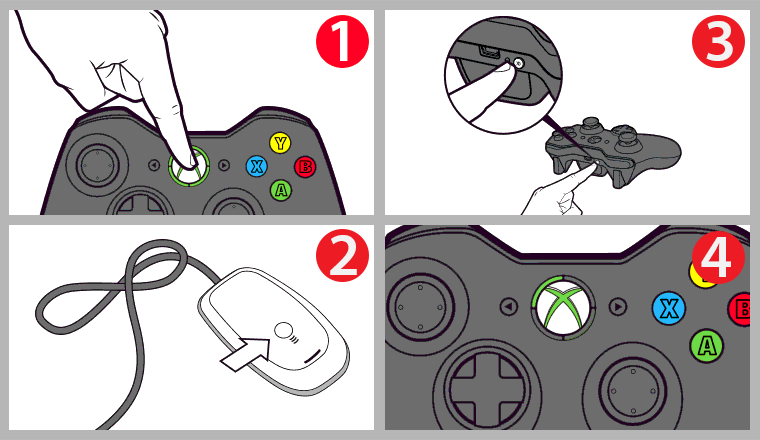
Connect the gaming receiver to a free USB port and check the receiver’s green light, which should go on or start blinking. Now follow the steps below to connect (one time only) your controller (see the figure):
- Press the big XBox logo button (a.k.a. the “Guide” button) on the game controller for it to switch on.
- Press the button on the USB receiver.
- Press the Connect button on the game controller.
- The circle around the Xbox button should light up one quarter of the circle indicating the controller number.
3. Configure the controller
The above steps are enough to get your controller working in most situations. In case if you want to change specific configurations of your controller (e.g invert the axis), you just need to head to "System Preferences" and click "Xbox 360 Controllers".
Joystick Doctor
The perfect tool to help you play your games with a controller on your Mac.